Recipe: Creating a Project and an Activity

A straightforward way to create an Android project or any of its components is to use the Eclipse Integrated Development Environment (IDE).This method ensures proper setup of the supporting files.The steps to create a new Android project are
  1. In Eclipse, choose File → New → Android Project.This displays a New Android Project creation screen.
  2. Fill in the Project name, such as SimpleActivityExample.
  3. Select a Build Target from the choices provided.These choices are based on the Software Development Kit (SDK) versions that are installed on the development computer.
  4. Fill in the Application name, such as Example of Basic Activity.
  5. Fill in the Package name, such as com.cookbook.simple_activity.
  6. To create the main activity in the same step, be sure Create Activity is checked and fill in an Activity name, such as SimpleActivity.
All activities extend the abstract class Activity or one of its subclasses.The entry point to each activity is the onCreate() method. It is almost always overridden to initialize the activity, such as setting up the UI, creating button listeners, initializing parameters, and starting threads. If the main activity is not created with the project or another activity needs to be added, the steps to create an activity are
  1. Create a class to extend Activity. (In Eclipse, this can be done by right-clicking on the project, choosing New → Class, and then specifying android.app. Activity as the super class.)
  2. Override the onCreate() function. (In Eclipse, this can be done by right-clicking on the class file, choosing Source → Override/Implement Methods..., and then checking the onCreate() method.)
  3. As with most overridden functions, it must invoke the super class method, too; otherwise, an exception may be thrown at run-time. Here, the super.onCreate() should be called first to properly initialize the activity, as shown in Listing 1.1. 
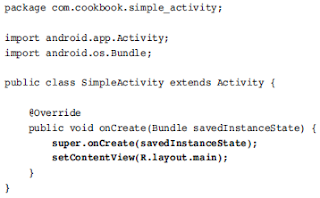
Simple Activity coding developer android
Images 1.1 Simple Activity

4. If a UI is used, specify the layout in an XML file in the res/layout/ directory. Here it is called main.xml, as shown in Listing 1.2.
5. Set the layout of the activity using the setContentView() function and passing it the resource ID for the XML layout file. Here, it is R.layout.main, as shown in Listing 2.1.
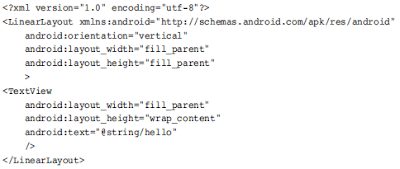
main xml coding android development
Images 1.2 Main.xml


6. Declare the properties of the activity in the AndroidManifest XML file.This is covered in more detail in Listing 2.5.
Note that the string resources are defined in the strings.xml file in the res/values/folder, as shown in Listing 2.3.This provides a central place for all strings in case text needs to be changed or reused.
strings xml
Images 1.3 String.xml
Now a more detailed look at the directory structure of this project and the additional auto-generated content is explored.

Charging for an App

Every time a new application or its update is uploaded to the Android Market, the developer must choose whether to provide it for free or charge for it. Following are the main options:
  • Provide the app for free. Everyone who can access the Android market can see and install the app.
  • Provide a free app, but include advertisements. In some cases, the developer negotiates sponsorship for an app. More often, the developer works with a third-party aggregator. Payouts are provided for clicked ads and less often for impressions (ad views). Figure 1.1 shows an example banner ad from AdMob. Such ads require the application have permission to access the Internet and the location of the device. Consider using coarse location instead of fine location to avoid deterring some potential customers from installing the app.
  • Provide the app for a charge. Google handles its charges, but takes 30 percent of the proceeds. Countries that are not set up for charges through Google Checkout cannot see or cannot install an app for charge. For these reasons, some developers turn to third-party app stores for distribution.
  • Post a free, limited version, but charge for a full version.This gives users the opportunity to try the app and if they like it, they will have less resistance to purchasing the full version. For some apps, this is a natural model (such as a game with ten free levels), but not all apps can be partitioned this way.
  • Sell virtual goods inside the app.This is an important way Facebook apps work, and it is catching on in the mobile world.
Free applications tend to get a lot of views. Even the most obscure and odd applications seem to be downloaded and viewed by at least 1,000 people in the first month the application is on the Market.There are some developers who explicitly say,“This app is absolutely useless,” and yet, they get over 10,000 downloads and a four-star rating. Somewhat relevant free applications can get as many as 50,000 downloads, and extremely useful free applications have over 100,000 downloads. For most developers, such exposure is quite impressive.

Mobile advertisement is still in its infancy and usually does not entice enough users to click the ad. For now, monetizing apps is best done by charging on the Market.As long as the app is useful for some people, has a clear description, and has a good selection of positive reviews, users purchase it. If an app is successful, it might make sense to raise the price of the app.

Software Features and API Level

The Android OS periodically rolls out new features, enhancements such as improved efficiency, and bug fixes.A main driver in OS improvement is the increased capability of hardware on new devices. In fact, major releases of the OS are generally coordinated with new hardware roll-outs (such as Eclair’s release with Droid).

Some legacy Android devices cannot support the new version requirements and are not updated with new OS releases.This leads to a user base with a variety of different possible experiences.The developer is left with the task of checking for device capability or at least warning devices of required features.This can be done through a check of a single number: the API level.

The following summarizes the different OS releases and main features from a developer’s perspective:
Cupcake: Android OS 1.5, API level 3, Released April 30, 2009
  • Linux kernel 2.6.27.
  • Smart virtual (soft) keyboard, support for third-party keyboards.
  • AppWidget framework.
  • Live Folders.
  • Raw audio recording and playback.
  • Interactive MIDI playback engine.
  • Video recording APIs.
  • Stereo Bluetooth support.
  • Removed end-user root access (unless tethered to computer and using SDK).
  • Speech recognition via RecognizerIntent (cloud service).
  • Faster GPS location gathering (using AGPS).
Donut: Android OS 1.6, API Level 4, Released September 15, 2009
  • Linux kernel 2.6.29.
  • Support for multiple screen sizes.
  • Gesture APIs.
  • Text-to-speech engine.
  • Integrate with the Quick Search Box using the SearchManager.
  • Virtual Private Network (VPN) support.
Eclair: Android OS 2.0, API Level 5, Released October 26, 2009
Android OS 2.0.1, API Level 6, Released December 3, 2009
Android OS 2.1, API Level 7, Released January 12, 2010
  • Sync adapter APIs to connect to any backend.
  • Embed Quick Contact accessible in applications.
  • Applications can control the Bluetooth connection to devices.
  • HTML5 support.
  • Microsoft Exchange support.
  • Multitouch is accessible through the MotionEvent class.
Animated wallpaper support.
FroYo: Android OS 2.2, API Level 8, Released May 20, 2010
  • Linux kernel 2.6.32.
  • Just-In-Time compilation (JIT) enabled, leading to faster code execution.
  • Voice dialing using Bluetooth.
  • Car and desk dock themes.
  • Better definition of multitouch events.
  • Cloud-to-device APIs.
  • Applications can request to be installed on the SD memory card.
  • Wi-Fi tether support on select devices.
  • Thumbnail utility for videos and images.
  • Multiple language support on keyboard input.
  • Application error reporting for Market apps.
Android is starting to mature in that releases are less frequent.Although possible, the over-the-air updates are logistically tricky and carriers prefer to avoid them. Hardware manufacturers also appreciate a level of stability, which does not mean the first flashed devices in stores need an immediate update.However, when a release is made, the level of additional features for developers remains high and worthwhile to utilize.

Emulator and Android Device Debug

The emulator launches a window on the development computer that looks like an Android phone and runs actual ARM instructions. Note the initial startup is slow, even on high-end computers.Although there are ways to configure the emulator to try to emulate many aspects of a real Android device such as incoming phone calls, limited data rate, and screen orientation change, some features (such as sensors and audio/video) are not the same.The emulator should be considered a useful way to validate basic functionality for devices not available to the user. For example, the tablet screen size can be tried without purchasing a tablet.

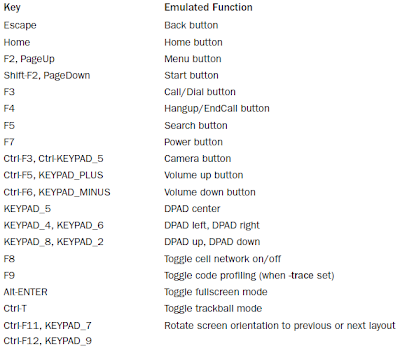
Note that a target virtual device must be created before the emulator can properly run. Eclipse provides a nice method to manage Android Virtual Devices (AVD).A handy list of keyboard shortcuts for emulator functions is shown in image 1.1.
Android OS Emulator Controls
Image 1.1
In general, the first testing is best done with an Android phone.This ensures full functionality and real-time issues that cannot be fully recreated with the emulator. For an Android device to be used as a developer platform, just hook it to the USB using the USB cable that came with the phone and ensure the USB driver is detected (this is automatic with a MAC; the drivers are included with the SDK for Windows; and see Google’s web page for Linux).

Some settings on the Android device need to be changed to enable developer usage. From the home screen, select MENU → Settings → Applications → Unknown sources and MENU → Settings → Applications → Development → USB debugging to enable installation of applications through the USB cable.

Software Development Kit


The Android SDK is comprised of the platform, tools, sample code, and documentation needed to develop Android applications. It is built as an add-on to the Java Development Kit and has an integrated plugin for the Eclipse Integrated Development Environment.

Installing and Upgrading

There are many places on the Internet that discuss detailed step-by-step instructions on how to install the Android SDK. For example, all the necessary links can be found on the Google website http://developer.android.com/sdk/. Therefore, the general procedure outlined here serves to emphasize the most common installation steps for reference.These steps should be done on a host computer used as the development environment.

  1. Install the Java Development Kit (for example, install JDK 6.0 for use with Android 2.1 or above; JDK 5.0 is the minimum version needed for any earlier version of Android).
  2. Install Eclipse Classic (for example, version 3.5.2). In the case of Windows, this just needs to be unzipped in place and is ready to use.
  3. Install the Android SDK starter package (for example, version r06). In the case of Windows, this just needs to be unzipped in place and is ready to use.
  4. Start Eclipse and select Help → Install New Software..., and then type https://dl-ssl.google.com/android/eclipse/ and install the Android DDMS and Android Development Tools.
  5. In Eclipse, select Window → Preferences... (on a Mac, select Eclipse → Preferences)and select Android. Browse to the location where the SDK was unzipped and apply.
  6. In Eclipse, select Window → Android SDK and AVD Manager → Available Packages, and then choose the necessary APIs to install for example, Documentation for Android SDK,API 8; SDK Platform Android 2.2,API 8; Google APIs byGoogle Inc.; and Android API 8).
  7. From the same Android SDK and AVD Manager menu, create an Android virtual device to run the emulator or install USB drivers to run applications on a pluggedin phone.
  8. In Eclipse, select Run →Run Configurations... and create a new run configuration to be used with each Android application (or similar for a Debug Configuration). Android JUnit tests can be configured here, too.
Now, the environment should be configured to easily develop any Android application and run on the emulator or an actual Android device.To upgrade to a new version of the SDK, it is simply a matter of selecting Help ➞ Software Updates... in Eclipse and choosing the appropriate version.