Emulator and Android Device Debug
The emulator launches a window on the development computer that looks like an Android phone and runs actual ARM instructions. Note the initial startup is slow, even on high-end computers.Although there are ways to configure the emulator to try to emulate many aspects of a real Android device such as incoming phone calls, limited data rate, and screen orientation change, some features (such as sensors and audio/video) are not the same.The emulator should be considered a useful way to validate basic functionality for devices not available to the user. For example, the tablet screen size can be tried without purchasing a tablet.
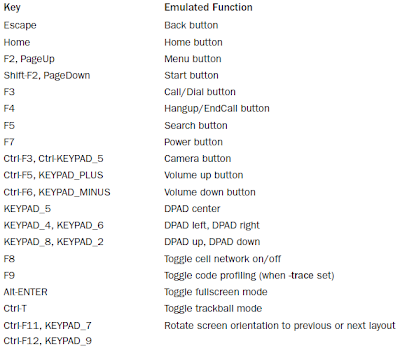
Note that a target virtual device must be created before the emulator can properly run. Eclipse provides a nice method to manage Android Virtual Devices (AVD).A handy list of keyboard shortcuts for emulator functions is shown in image 1.1.
 |
| Image 1.1 |
Some settings on the Android device need to be changed to enable developer usage. From the home screen, select MENU → Settings → Applications → Unknown sources and MENU → Settings → Applications → Development → USB debugging to enable installation of applications through the USB cable.
0 komentar:
Posting Komentar