Recipe: Creating a Project and an Activity
A straightforward way to create an Android project or any of its components is to use the Eclipse Integrated Development Environment (IDE).This method ensures proper setup of the supporting files.The steps to create a new Android project are
- In Eclipse, choose File → New → Android Project.This displays a New Android Project creation screen.
- Fill in the Project name, such as SimpleActivityExample.
- Select a Build Target from the choices provided.These choices are based on the Software Development Kit (SDK) versions that are installed on the development computer.
- Fill in the Application name, such as Example of Basic Activity.
- Fill in the Package name, such as com.cookbook.simple_activity.
- To create the main activity in the same step, be sure Create Activity is checked and fill in an Activity name, such as SimpleActivity.
- Create a class to extend Activity. (In Eclipse, this can be done by right-clicking on the project, choosing New → Class, and then specifying android.app. Activity as the super class.)
- Override the onCreate() function. (In Eclipse, this can be done by right-clicking on the class file, choosing Source → Override/Implement Methods..., and then checking the onCreate() method.)
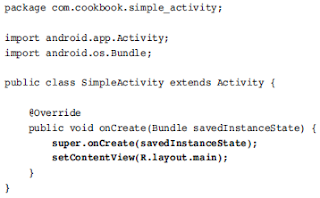
- As with most overridden functions, it must invoke the super class method, too; otherwise, an exception may be thrown at run-time. Here, the super.onCreate() should be called first to properly initialize the activity, as shown in Listing 1.1.
 |
| Images 1.1 Simple Activity |
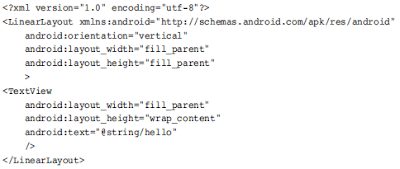
4. If a UI is used, specify the layout in an XML file in the res/layout/ directory. Here it is called main.xml, as shown in Listing 1.2.
5. Set the layout of the activity using the setContentView() function and passing it the resource ID for the XML layout file. Here, it is R.layout.main, as shown in Listing 2.1.
 |
| Images 1.2 Main.xml
6. Declare the properties of the activity in the AndroidManifest XML file.This is covered in more detail in Listing 2.5.
|
Note that the string resources are defined in the strings.xml file in the res/values/folder, as shown in Listing 2.3.This provides a central place for all strings in case text needs to be changed or reused.
 |
| Images 1.3 String.xml |
Now a more detailed look at the directory structure of this project and the additional auto-generated content is explored.
0 komentar:
Posting Komentar